Friday, 11 December 2009

Project: FTR (getting tired of typing that all out)

So now that everything is dried and attached, I have placed the neck piece onto the helmet (with help from my friends, seeing as I needed about ten pairs of hands to get everything in place). The Helmet was finally done and looked AMAZING.

After that was attached Iglued the shawl to the top of the helmet to keep everything in place and placed a spare piece of fabric behing the bones so none of the seams from the garment would should (as this appears to be what has been done in the film costume). However, the one thing i was dissapointed in, the shawl bunched on one side of the shoulders. Iwas expecting something to be wrong with this part because of the lack of arms and shoulders on the dress form, but it would be very difficult to fix on my own (seeing as i can't pin the garment on myself) so i am just going to have to leave it. : (

And now everything is done and ready to hand in!!!!!!!!!!!!!!!

I tried to keep this garment fan based and not a replica costume (an exact copy of the film garmets). I liked this idea of making the garment and posting on the blog because it kept it as part of the fan community (which is what my dissertation was based on).
This garment was picked mostly because there wasn't much written on it and I thought it was a good opportunity to do research and postings on this blog, as well as others, to bring forth what a fan goes through to create a fan based garment. It as opened my eyes to the depths that fans go through and how the fan community works. It's been an incredible experience, and Iplan on doing more things like this in the future (my boyfriend and I have already decieded to branch out and do some helmets....maybe a storm trooper or bobba fett.....or possibly branch out into the halo world).
Anyway here are some photos of the completed garment, hope you like it! One is of a very sleepy me handing it in. Not so glamourous : P


Thursday, 10 December 2009

Project: Female Tusken Raider

AFter the fimo dried out the 'bones' were glued into place down the mask and then for the attachment detailing small pieces of cardboard that were shaped to bend were used. To give these small pieces studs a drop of hot glue from the glue gun was used and left to dry. then these pieces were painted in the same manner as the helmet and place at the edges of the bones.

Wednesday, 9 December 2009

Project: Female Tusekn Raider

Paint is dried and now working on the neck bit.

For the small squares I am using 2 by 2.5 inch cardboard pieces and glueing them to wire to give it a bit of bend. For the studs I went out and got gold studs at the hardware store and will be painting them along with the rest of the neck piece. However, I didn't quite buy enough so my friend made a clay mold for me of one of the studs and we will be making any missing studs out of a wax from this mold. He is a genius and saved me from going crazy on this one.


After placing the studs on with a hot glue gun and painting over everything I attached a thick rope with beads (made out of 2 inch duct tape). This is for the detailing right next to the bone detailing as you can see below.

For the bones I went out and got Fimo (sculpting clay) and they were placed around a coffee mug and left to dry out to get the curve. However what I didn't know about the fimo was that it was glow in the dark, I thought it was just very white when I bought it. My firend and i went to go turn off the lights in the studio and were shocked to find my mask glowing.

Tuesday, 8 December 2009

Project: Female Tusken Raider

Painting is done and it looks awesome!
It really looks like metal!!!
After letting the brown paint dry and went in a basically just finger painted on the metal paints to give it a hammered look. Was very messy....and so much fun!!!
I wish I had some photos to post but my camera died on me!!! : (

Monday, 7 December 2009

Project: Tusken Raider

I'm in sussex at an art studio that my firend has let me use!! I am so incredibly thankful that they are letting me use their place, my flat is WAY too small to compelete this project!!
So excited to see how this all turns out!

First I added all the metal and cording detailing along the top of the mask and then primed it to get an nice smooth finish.
Once that drys I'll begin to paint it with dark brown acyrilic paint and then detail it with some copper and gold to give it a metal finish.

Saturday, 5 December 2009

Project: Female Tusken Raider

The skirt and shawl are completely done now just need to finish the helmet!
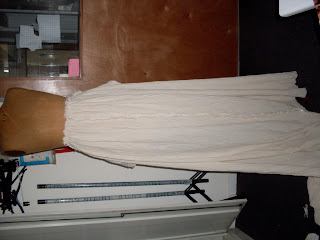
The skirt is a bit rugged, however I kind of like that about it. The character would have had it that way seeing as she is trekking through the desert. So I left it with some holes and frays.

Friday, 4 December 2009

Project: Female Tusken Raider

Have completed the structuring of the mask and covered it in plaster to get a nice hard shape was originally going to use fiberglass but was convienced not as apparently it's 'too dangerous'.....i thought it would have been a fun new experience.....
While the platser was drying I headed off into school to get to work on draping the skirt and bandage shawl.


The skirt went very quickly. The shawl however not so much. I completely forgot that the dress for does not have shoulders and would be the garment completely wrong shape for an actual person. Just have to wing that part (fingers crossed). Here is a photo, it's not rotated for some reason and the computer is being diffuclt...sorry!

Thursday, 3 December 2009

Project: Female Tusken Raider

To begin with the costume I started with the helmet, as it is the most difficult to complete. I went out and bought a skaters helmet and am going to start structuring it with card stock and sytrofoam to get the shape of the mask/helmet.
I'll post some pictures when I get through the process.

Tuesday, 1 December 2009

Dissertation: Costume

Ok so the creation of the costume has started! I purchased all of my fabrics today and I washed and dyed them to match that of the female tusken raider. So far so good! However, I am having some problems getting into my schools sewing labs which could be pretty bad if I don't get in there soon.
I am still trying to figure out the mask. I was looking at the website instructables.com (which i am in love with) and found this tutorial
Which could be the best way to get the rounded shape (using a helmet) and would cut my time in half.
or this one
which, i think, would take much longer. The clay would take a day to dry on its own.

So much work to be done and so little time!!!!!!!